Installing Decal Murals
parodi on paperhanging PWC Magazine
December 2009
Shortly after I completed last issue's column on digital murals I got a phone call from a local insurance company asking if I would install a self adhesive decal mural in the common area of the building. You know how it is when someone requests that you do something you have never done? I usually panic. I vamped a little on the phone line talking about the insurance biz (of which I know nothing about) trying to decide if I wanted to take this job or pass. I imagined what the job would be like..."Let's see, an expensive custom mural...using application techniques I have never used...I have absolutely no idea what to do when I get a wrinkle or something else goes wrong...hmm....I pass." But even though I had mentally turned it down, I always try to pass the job on to someone else who may in turn send something on to me if they get a similar call for installing difficult wallpaper. I told the insurance company that I know someone who specialized in this type of install and would put him in contact with them.
That someone is Charles Costanza of Yonkers, NY. I sent him the job on the condition that he would put up with me asking dumb questions and snapping photos while he worked. Being all pro he told me it wouldn’t bother him a bit. I watched Charles hang the three panel self-stick mural and photographed as much as I could as he explained what he was doing through the entire process.
So how does one hang one of these self stick things? I think most people conjure up visions of their first apartment where they were made to look like an inept fool installing contact paper in the kitchen cabinets. You can relax about that though--self stick murals are a lot more forgiving. But the procedure is quite different from “wet paste” wallpapering.
First thing that's completely different from wallpapering is to specify, if possible, that the wall be primed with a pigmented shellac primer. This puts a hard crust on the paper facing of sheetrock and doesn't raise the nap like an oil based primer. After the pigmented shellac is applied then comes a coat of semi-gloss latex. Many manufacturers of decal murals call for this. I asked Charles if he had any particular brand preferences. He answered in the negative, but told me to keep in mind that if there is any problem of paint film adhesion the problem is the installer's not the decal manufacturer. I took that to mean "use a high quality 100% acrylic."
Once the walls are prepared, Charlie tries to find a place to lay out the whole mural on a floor somewhere. We found a large empty conference room and Charles laid the panels down for quality control. Since each panel is unique you want to know if there is a print problem before you start.
Then he measures the actual width of the mural once the “bleed” is taken into account― the bleed being the areas of image duplication which are overlapped. Charlie says that some digital printers have the selvage hand trimmed and panels may be of differing widths, so it is important to only use the mural image as a guide, not your ruler. Charlie says to always pay special attention to any text first because out-of-whack text shows the most from a distance.
He also makes horizontal marks across the join area with a grease pencil to help him immediately find the match when he goes to the wall. This was very helpful on this mural because the join area at the top of his ladder was mostly sky blue. Obviously there is no “slip” so one should be able hit the marks on the first try. Charlie says that most digital decals allow for limited positioning but some don't allow for it at all.
Charles carries a camera phone with him. If he finds a defect he takes a photo and sends it to the customer or designer. I asked him if he ever touches up a mural with any sort of artist’s paint. He says “never” due to the “ink sheen vs. paint sheen” problems ….but sometimes he will use a magic marker for small nicks. Charlie says he is also paid to show up and if other contractors are still working or if someone just painted an hour before he arrives it is not his problem. If he has to come back because of a situation like this he gets paid twice. The other good news about this bold stroke is that there are few other installers in the area so he is actually able to collect the two checks.
Note that if one panel is defective you cannot replace that one panel. Each mural consists of one color run so that duplication of a single panel is not possible.
Everything at the jobsite seems to be in order so it is time to go to the wall. Charlie finds the center of the wall in the usual way and makes pencil marks on masking tape for the left and right edges of the mural. This is a good way to avoid erasing pencil marks from paint later on. Then he shaves the wall for any nits or pimples. One huge aid is the self leveling laser lever he uses which casts a straight vertical and horizontal line.
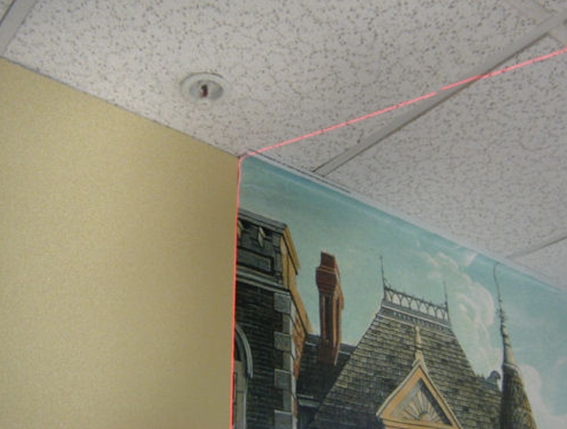
After checking the drop ceiling for horizontal trueness he prepares the first panel. He removes divots from the backing so that he can place the panel without involving the entire self adhesive surface area. Then places the panel using the projected laser beam:
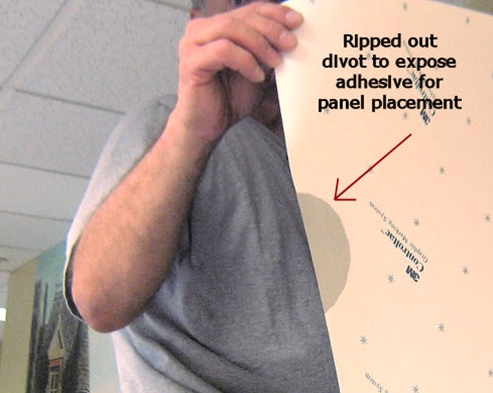
Press and stick murals have pressure sensitive adhesive which only sets after pressure is applied. It is amazing how the material can be repositioned up to the point where pressure is applied.
Often decal murals are specified with a 2 inch buffer for top and bottom. This usually gives you a lot of leeway for crooked ceilings or crooked baseboards. But it is still a good idea to draw a midline and measure to the ceiling and floor anyway to make sure that, God forbid, you don't go running off. It can be difficult to remove recently installed panels where pressure has already been applied.
Also Charlie warns that some panels will actually stretch with gravity. For this reason you should check for correct register all the way down each piece once you start hanging. If a panel has to be specially worked with you may use a heat gun or propane torch.
Once the panel is true, Charlie pulls back on it and cuts out a wide section of the self stick backing:
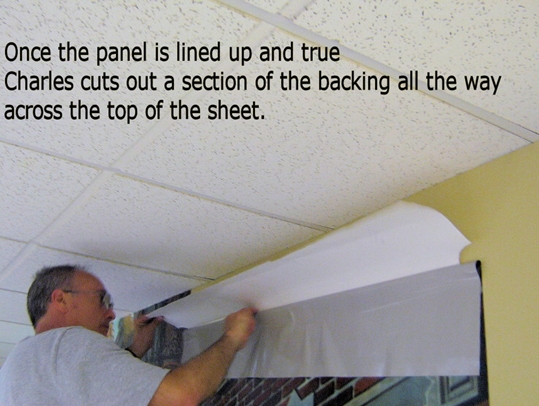
Then he sets the top of the panels and starts peeling back sections of the backing as he works each area on his way down to the bottom.
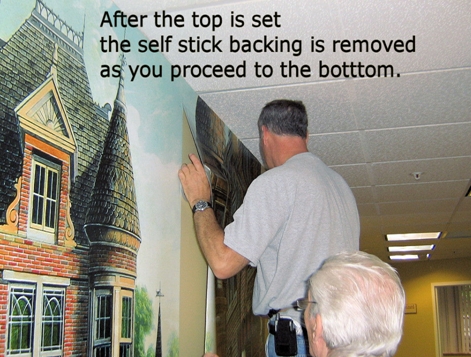
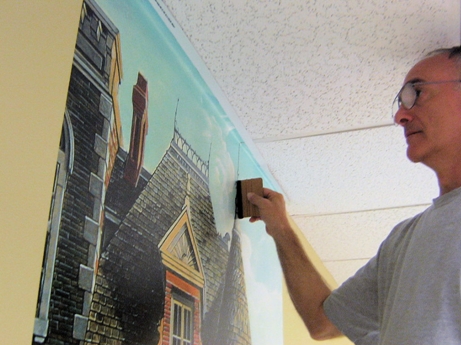
Charlie began his first panel on the left and moved towards the right. He used the laser again to set up the second panel making sure that panel was plumb too He then smoothed to the left to work towards the overlapped seam. He uses a special narrower and stiffer smoother than is used for wet wallpapering.
In addition to wall murals, Charlie also applies digital vinyl to buses, trucks or just about anything. If you think you might want to branch out from the wallpapering market and supply your area with this service you might want to get some formal training from 3M.
3M offers the Wrap Master Course, a four day training course which takes place in St. Paul Minnesota to teach advanced installation techniques for self adhesive materials. The cost for each attendee is $900. (Contact Casandra Nelson at
651-736-9354 /cnelson1@mmm.com.) There you will learn about all sorts of self stick applications besides application to flat walls. Instruction includes applying self stick vinyl to the curves of the front half of a Chevy Envoy and the rear half of a Chevy HHR as well as application to trucks and buses with rivets and without. There is a special tool to deal with rivets and I’m sure there is a lot of other arcane information specialized to this type of work. After the 4 day course, applicants take a hands-on test and a 50 question written test afterward.
If you really want to get serious about this technology you can become certified and recommended as a certified installer by the United Application Standards Group (http://www.uasg.org)
I have to admit that it was very calming to watch a maestro like Charlie ply his trade and everything looked great as he finished the last piece. There was no cursing, crying or throwing of things at all (as I expect would have been the case had I attempted this job.) I am very glad I turned this job down and learned something very important ---I would need a whole lot of hands on experience before I ever attempted one of these alone.
Back